Shot one:
This shot was asking for a rotoscope of the 'glass container' around the mans hand, as well as the 'red glass interior'. The problem with this initial shot is that not only does it have a certain amount of motion blur, but the interior of the lamp itself is not clear during the begging of the shot.A way to fix this is to start the rotoscope in the middle:


Once these initial rotoscopes are in place, the rotoscopes are then manually tracked and altered throughout the shot to adapt to the what the container looks like:


The final node tree is very simplistic, as this shot included only the rotoscope and the source footage:

Shot two:
Bluescreen of the man staring into the sky:

The work for this shot is accomplished by using the same blue screen methods as the blog post on the 'Altar sequence', the first thing that is needed is a rotoscope around the man, the branch and the glass container in the bottom right (Alongside the red glass interior):


The rotoscope is tracked throughout the shot to make sure everything that is needed, is outlined, next the keylights must be integrated into the shot in order to take out the blue colour and make this shot workable for another background. The screenshots below show the first keylight when it is created, and the screen colour picked:


There is a large amount of transparency in this, and parts of the branches are missing due to the colour chooser, so the inner and outer keylights are then used to fill out this alpha:


The inner keylight has now shown the inner detail of the rotoscoped objects, so the entirety of the branch is seen again, it also fills in the transparency on the man. The inner keylight is now linked to our first keylight by using the pipeline 'InM' (meaning Inner matte) with the inner keylight:

The outer keylight is then created from the information from the inner keylight, and used to make a halo around all of the rotoscoped material so that they can be integrated into the bluescreen shot, this is connected to our rotoscope via the 'Bg' (Background) pipe connection:


Now that these keylights have been used, the original keylights components are set to 'Alpha' and 'Inverted alpha' in the inner matte and outer matte component:

The finished product of the combined keylights mean that this shot is now ready to be used against a test plate:


With this complete, a merge node was used to attach this hold out matte against the bluescreen, to a blue test plate, by using a reformat node for the blue test plate:


The combined create the final effect, the rotoscoped man, branch, container and interior of the container against a backplate that shows it works, the VFX artist can now use what effects they wish for this shot:


The final node tree is organized well so that the pipes and connections are easy to see and utilise should any further fixations or changes be made to the nuke script:

Shot three:
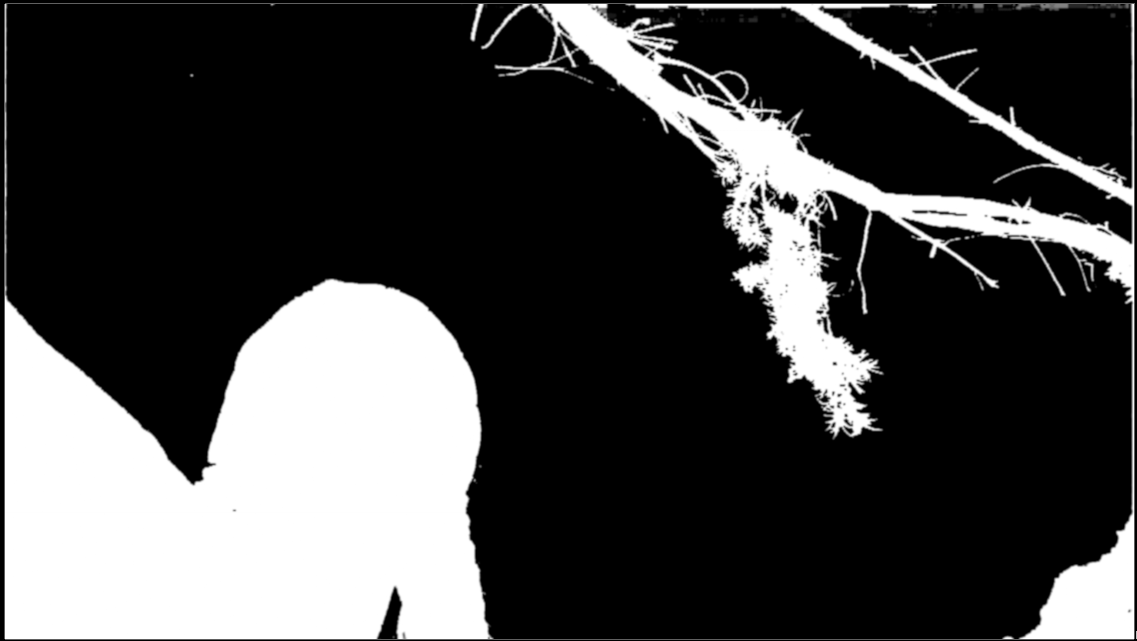
The aim for this shot is to 'create hold out matte for container and separate hold outs for the red glass interior of the container and the man's hand', therefore, a detailed rotoscope is needed for this hold out matte.
This shot differs from the first in that the container shows more detail, so the rotoscope must be adjusted to encompass the red glass interior that is now shown, alongside the new detail of the outside of the lamp and the mans hand:


This shot shows the most detail of the glass container, so the rotoscope had to be accurate because this would be the shot that gives the most focus of VFX on the container.
Folders were again created for the individual beziers and named so that the rotoscopist can keep track of what he has rotoscoped and where they are inside the shot, this organization helps when you need to give this script to another to work upon, or for someone to open up and simply find these beziers.


Shot four:
Shot four requires 'create hold out matte for container and separate hold outs for the red
glass interior of the container and the man's hand and the foreground elements ', therefore not only would a rotoscope of the container have to be created, but any interacting 'foreground element', which in this shot came in the form of some foliage:


Next, a rotoscope was created for the container, hand and for the glass interior that can be seen in the shot:


The rotoscopes are now inside the shot, so a tracker is used to track the information of the lamp throughout the shot, so that the rotoscope moves with clean movements, which does not happen during self movement of the rotoscopes by each frame manually:

The rotoscope and the foreground element can work together so that the VFX will appear behind the plant leaves in the shot.
The final node tree for this shot was comprised of the tracker, the rotoscopes, the source footage and the merge nodes used to connect the rotoscopes and the tracker together:

Shot five:
Shot five consists of 'please review footage, use your judgement to determine if any work is needed or viable.' and, looking at the current shot, the footage seems shaky, and this can be cleared up with the tracker and transform as has been used on the previous blog posts.
A tracker has been used to track a leaf in this shot, which appears still throughout the entirety of the shot, which means that the stabilisation option will be clearer and the transform needs only to be scaled out:

This shot was scaled to '1.11' to keep the original frame, which is moving because of our stabilise, as close to the 1920 x 1080 sized shot, to keep as much of the original frame in as possible.
The final node tree was then formed using a backdrop with its own title, and named tracker and transform nodes:

Shot six:
The next shots (up to fifteen) are shots that are not needing prepping in nuke, but instead, an outline of the visual effects that these shots would need.
To fit in the colour schemes, the girl wears a purple shirt, the antagonist with the different shades of red. The antagonist also has the container, so if the VFX artist knew the narrative, perhaps the container gives him powers the girl does not.
Keeping with the colour scheme, the girl waves her hand into position, if she had any sort of particle effect or flame, there may be a trail that lingers after, this fire scheme with colour would show how both of them utilise their fictional powers, so they might be similar:

 In this shot, they would be starting to use their powers, so a good thing to do is to build up the tension by having the VFX small at first, but then more reveal as they concentrate.
 As he starts to move his hands, his power may build up, the more erratic his movements, the move effects that should be used, to capture the point he is more powerful than the girl.
 As his hand movements become more erratic, so should the effects surrounding him, he colour for the effects would match his colour scheme, and would slowly start to envelope him as he builds up this magic.


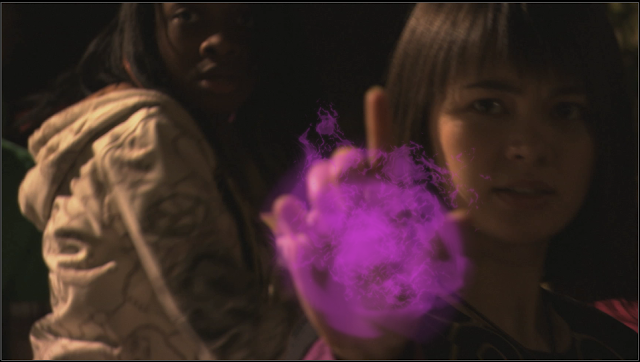 This shot would showcase the close up of the girl, her powers and the shocked expressions of the other children, so the powers she uses would be still swirling, but not as powerful as the antagonist, to show the level of difference in how they wield their powers. The visual effects of purple light may shimmer and move on her hand, but not expand or develop further.
 As the thralls surge forward, there should be extra visual effects on the antagonists hand to show his power of control over these thralls of his, this might come across to the target audience more, so if his power over them is broken, perhaps so too is the extra visual effect and colour.
 As the thrall would come forward, his weapon utilising the same colour glow as the antagonists power would show their connection, but also create an amount of fear in the children, this thralls weapon would look to be infused with magic, as if it is aflame, so the visual effects would be particle effects of flame for the staff, and glow for the thralls eyes.
 For shot fourteen, the girl looks around swiftly before the thralls attack, so perhaps she tries to release the magic, but does this too late, so in this small framed shot she would propel it forward, but this would cut straight to the next shot where is seems to have failed, so the visual effects added here would be a trail from her hand to the ball of magic.
 The final shot of this sequence would showcase the antagonists power, to show that his first built up power is replaced by this new and more deadly looking bright colour of red, the visual effects of this shot would be the swung weapon of the thrall, set ablaze, and the antagonists power still growing in the background.
To fit in the colour schemes, the girl wears a purple shirt, the antagonist with the different shades of red. The antagonist also has the container, so if the VFX artist knew the narrative, perhaps the container gives him powers the girl does not.
Keeping with the colour scheme, the girl waves her hand into position, if she had any sort of particle effect or flame, there may be a trail that lingers after, this fire scheme with colour would show how both of them utilise their fictional powers, so they might be similar:


Shot seven:
This shot shows the man as he looks to be utilising his power. Perhaps because he has this container, the thralls in the background may have a glow similar to the powers he uses that will show they are under his control.


Shot eight:
This shot shows both the girl and the antagonist squaring off in an intense stare, this would be a good time to showcase the visual effects for both of the characters, to show the man has concentrated his power and it may be changing into something fiercer, whilst the girls still stays the same, to show the level of danger and shift of power.

Shot nine:
In shot nine, the antagonist would be sending his thralls forward to attack the children, so the effects should 'flare' up brightly when he initiates them to attack, it would be this point that his control of these thralls begins, so I would add another colour to his hand, a bright red, to show a possible connection between himself and these thralls.
Shot ten:
 This shot would showcase the close up of the girl, her powers and the shocked expressions of the other children, so the powers she uses would be still swirling, but not as powerful as the antagonist, to show the level of difference in how they wield their powers. The visual effects of purple light may shimmer and move on her hand, but not expand or develop further.
Shot eleven:

Shot thirteen:

Shot fourteen:

Shot fifteen:

No comments:
Post a Comment